As an Amazon Associate, we earn from qualifying purchases. Some links on this site are affiliate links at no extra cost to you. Our recommendations are based on thorough research and editorial judgment.

How to Get Sharp Low-Light Photos Without Cranking ISO
To capture sharp low-light photos without raising the ISO, we should focus on using wider apertures and slower shutter speeds. A wide aperture, like f/1.8, lets in more light, which helps improve clarity. Keeping the shutter speed at least 1/50 seconds prevents motion blur when shooting handheld. Additionally, using a tripod can stabilize the camera for longer exposures, reducing shake. Next, we can explore the role of light sources and other techniques to enhance our low-light photography.
Key Takeaways
- Use a wide aperture (low f-stop number) to let in more light and achieve faster shutter speeds.
- Stabilize your camera with a tripod or stable surface to prevent camera shake during longer exposures.
- Set your shutter speed to at least 1/50 seconds for handheld shooting to minimize motion blur.
- Utilize exposure compensation settings to brighten subjects in dim lighting without increasing ISO.
- Capture images in RAW format for better post-processing flexibility to enhance details and reduce noise.
Understanding Low-Light Photography Challenges

When it comes to low-light photography, the challenges can feel a bit daunting, but don’t worry, I’ve got some tips for you! One of the biggest hurdles is dealing with high ISO settings. While they can brighten up your pictures, they also introduce noise, which results in grainy images. Imagine trying to capture a cozy evening scene in a restaurant. If you crank up your ISO too high, your beautiful candlelit moment might end up looking like a pixelated mess.
Another thing to watch out for is using slower shutter speeds. If your shutter is open longer, you risk moving the camera, which can lead to blurry photos. A good rule of thumb is to keep your shutter speed at least above 1/50 seconds when shooting handheld. If your hands aren’t the steadiest, think about using a tripod or even putting your camera on a stable surface.
One quick fix for low-light situations is to use a wider aperture, which means setting a lower f-stop number. This allows more light to hit your camera sensor, letting you shoot at faster shutter speeds. For instance, if you’re photographing a lively street scene at dusk, a wider aperture will help you capture sharp details without worrying about motion blur.
Using cameras with built-in image stabilization can also significantly reduce blurriness in low-light conditions by compensating for small hand movements.
Essential Camera Settings for Low Light

Capturing sharp photos in low light can be a bit tricky, but once you get the hang of the right camera settings, it becomes a whole lot easier. First off, let’s talk about shutter speed. If you’re shooting hand-held, aim for speeds of at least 1/50 of a second to avoid that annoying motion blur. When you have a tripod handy, you can slow things down even more, which can lead to some stunningly clear images.
Next up is your lens. A fast lens with a wide aperture, like an f/1.8, lets more light hit the sensor, which is super important in dark environments. For example, if you’re taking photos at a candle-lit dinner, that wider aperture will help you capture all the warm, cozy vibes without sacrificing clarity. Don’t forget to play around with exposure compensation too; bumping it up to around +0.7 or +1.0 can effectively brighten your subject in those dimly lit settings.
Lastly, using spot metering can really help dial in your exposure. It focuses on your subject and measures the light around it, which is perfect for low-light scenarios like capturing a friend on stage in a darkened room. By applying these tips, you’ll be well on your way to mastering low-light photography. And who knows, with a little practice, you’ll be able to tackle any lighting situation with confidence! Using a high-performance memory card with fast write speeds also ensures that your camera can save images quickly, minimizing missed shots in dim conditions.
Recommended Products

SONY USA AUTHORIZED - Includes Full SONY USA WARRANTY | Introducing the Sony Alpha a7S III - a new milestone in sensitivity, speed and image supremacy.

New internally zooming, internal focus F2.8 L-Series hybrid telephoto zoom lens featuring an iris ring for manual iris control.

New internally zooming, internal focus F2.8 L-Series hybrid telephoto zoom lens featuring an iris ring for manual iris control.
The Importance of Large Apertures

Hey! Have you ever wondered why large apertures, like f/1.4 or f/1.8, are such a big deal in low-light photography? Well, it’s pretty straightforward. When you use a large aperture, more light pours into your camera. This is super helpful when you’re in a dim setting, like a candlelit restaurant or a sunset scene. The extra light means you can use faster shutter speeds, which helps you avoid motion blur—perfect for those handheld shots.
Now, there’s another cool perk with large apertures: they create a shallower depth of field. This means your subject can really pop against the background—a technique that’s a favorite in portrait photography. For example, if you’re taking a close-up of a friend at a party, a large aperture will give you that lovely blurred backdrop that makes your subject stand out beautifully.
To maximize sharpness in low light, pairing a large aperture with back button focus can significantly improve autofocus accuracy and control.
Recommended Products
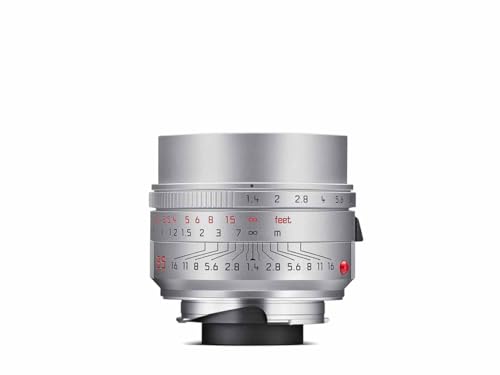
What's in the box: Leica Summilux-M 35mm f/1.4 ASPH Lens (Silver)

Photographers can enjoy shooting super dynamic photo been under the challenging condition like near the ocean, rain or snow.

Mounting type: Canon EF
Utilizing Slower Shutter Speeds
Hey! So, if you want to step up your low-light photography game, using slower shutter speeds is a fantastic way to do it. Typically, shooting at speeds between 1/30 and 1/125 seconds lets in more light to reach your camera’s sensor, which is super important in darker settings.
Now, to make sure your pictures stay sharp, a tripod is your best friend. It keeps your camera steady and reduces any chance of camera shake. Imagine you’re at a concert; using a tripod will help you capture those vibrant stage lights without the blur, allowing you to enjoy the moment later in a crystal-clear photo.
However, keep an eye out for moving subjects since they can create motion blur when using those slower speeds. A neat trick to combat that is using burst mode. By taking multiple photos in quick succession, you’re more likely to snag a sharp shot of that dancing crowd.
To enhance your low-light shots, consider using a DSLR light with a high Color Rendering Index to accurately capture colors even in dim environments.
Recommended Products

SUPERIOR STABILITY - Crafted with high-quality carbon fiber and aluminum alloy, this tripod supports up to 30 lbs, ensuring your camera stays steady for crisp, clear shots even with heavier equipment.

2 tier 75mm carbon fiber tripod with unique quick release fasteners for instant, easy use

HIGHER VERSATILITY: more options for shooting on sliders, jibs or other accessories thanks to the flat base
Reducing Camera Shake Techniques
Hey there! If you’re looking to reduce camera shake and snag some clearer shots in low-light situations, I’ve got some handy tips for you. First off, investing in a solid tripod is a game-changer, as it keeps your camera nice and steady, letting you use longer exposure times without worrying about blurry images.
Now, if you’re shooting without a tripod, consider using the self-timer or a remote shutter release. This little trick helps to avoid any vibrations that might come from pressing the shutter button—trust me, it makes a difference! Also, if your camera has stabilization features, like Nikon’s VR or Canon’s IS, definitely turn those on. They help smooth out your shots, especially when conditions are less than ideal.
If you can’t access a tripod, try leaning against a wall or finding a sturdy surface to brace yourself against. It’s surprising how much even a little support can help. And remember, picking the right shutter speed is crucial; aim for at least 1/focal length to keep everything sharp. For instance, if you’re using a 50mm lens, set your shutter to 1/50 seconds—this simple practice can really enhance your photography. Using equipment with 3-axis stabilization technology can further improve stability and reduce blur in challenging shooting environments.
Recommended Products

Bundle Includes: 1 x Leica Q2 Monochrom Digital Camera, 1 x SanDisk SecureDigital 64GB Extreme PRO Cmemory Card, 1 x Corel Photo Software With PhotoMirage, AfterShot, Painter Essentials, PaintShop Pro, and Video Studio, 1 x Memory Card Reader, 1 x 3 Piece Pro Filter Kit UV/CPL/F 49MM, 1 x Led Light, 1 x Deluxe Soft Case, 1 x Deluxe Cleaning Set, 1 x 12_inch Flexible Tripod, 1 x Memory Card Wallet, 1 x Lens Cap Keeper
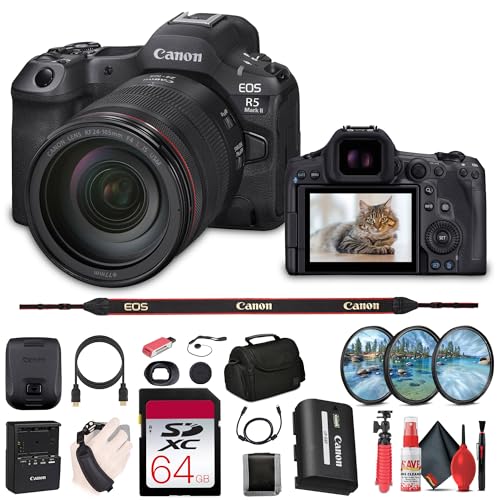
Bundle Items Include: Canon EOS R5 Mark II Mirrorless Camera with 24-105mm f/4 Lens, 64GB Memory Card, Soft Bag, Memory Card Reader, 3 Piece Filter Kit, 12" Flexible Tripod, Cleaning Kit, Memory Card Wallet, Hand Strap, Lens Cap Keeper, HDMI Cable

Bundle Includes: Sigma 150-600mm f/5-6.3 DG OS HSM Contemporary Lens for Canon EF, Backpack, Memory Card, Card Reader, Filter Kit
Incorporating Alternative Light Sources
If you’re looking to boost your low-light photography, incorporating alternative light sources can really make a difference! Adding in some lamps or LED lights can brighten up your scene without having to crank up your ISO, which often leads to grainy photos. For example, try positioning your subject near a window in the evening; the natural light can create a beautiful, soft effect that enhances your shot beautifully.
Another handy tip is to use diffused light sources, like softboxes or reflective umbrellas. These can help soften harsh shadows and create a more flattering look. If you want to get a bit creative, consider using colored gels on your lights. This simple addition can infuse your photos with interesting moods and artistic flair.
And don’t forget about bounce flash techniques! Instead of pointing your flash directly at your subject, angle it towards a wall or ceiling. This way, the flash light reflects and creates a much softer illumination, helping to keep your photos clear and crisp even in low-light conditions. So with these techniques, you’ll be well on your way to capturing stunning images in dim lighting! Using external microphones while shooting in low light can also enhance your video projects by improving audio clarity alongside your sharp visuals.
Choosing the Right Lens
Choosing the right lens is super important if you want to capture sharp photos in low light. It’s best to go for a prime lens with a larger maximum aperture, like f/1.4 or f/1.8. These types of lenses allow more light to hit the camera sensor, which is a huge help when you’re shooting in dimmer conditions.
For example, using a 50mm f/1.4 lens can really make a difference. It lets in a lot more light, so you can keep your ISO low, which improves image quality and reduces noise. Plus, if you pick a lens with image stabilization, it will help minimize motion blur, letting you shoot at slower shutter speeds when you’re holding the camera in hand—perfect for capturing that candid moment without needing a flash.
Oh, and don’t forget about the quality of the glass! High-quality optics really help reduce distortions and enhance sharpness. Look for lenses that maintain their sharpness even when you adjust the aperture. This attention to detail makes a big difference in the overall look and feel of your photos. Next up, let’s chat about how to care for your lens and keep it in top shape!
Also, choosing a lens with multi-coated glass can reduce lens flare and improve contrast, which is especially useful in challenging lighting conditions.
Recommended Products

Leica Summilux-M 50mm f/1.4 ASPH. Lens (2023) - A Contemporary Classic: This lens represents a modern reimagining of the beloved 50mm focal length, with a redesigned housing and updated optics.

Front & Rear Lens Caps - Original Box

Consists of eight lens in 5 groups
Experimenting With Composition
Hey there! You know, experimenting with composition is a fantastic way to level up your low-light photography. Instead of just cranking up the ISO, try the Rule of Thirds to frame your subjects in a more dynamic way. Imagine you’re shooting a lively street scene at dusk; place the people off to one side of the frame, allowing the glowing store windows to fill the other side. This approach not only creates a more engaging picture but also helps maintain clarity in dim conditions.
Another nifty trick is to look for leading lines or natural frames around you. For example, the edge of a sidewalk or the arch of a doorway can guide the viewer’s eye straight to your subject. This method keeps the image interesting and draws attention without overexposing areas. If you’re shooting a brightly lit subject, try to position it against a dark background. This contrast can reduce noise in your image while showcasing the details of your subject beautifully.
Don’t forget about your shooting angle! Positioning yourself to take advantage of nearby light sources—like a street lamp or light spilling through a window—can improve the sharpness of your shots. Finally, including elements in the foreground, such as leaves or a fence, can add depth to your photos, directing attention toward what you really want to capture. By using these composition tips, you can achieve stunning low-light images without relying heavily on high ISO settings. Also, choosing a camera with image processing technology like the DIGIC II Processor found in some DSLR models can help you capture sharper images with less noise in low-light conditions.
Post-Processing Techniques for Low Light Photos
Hey there! So, let’s chat about post-processing techniques for low-light photos. When you’re capturing images in dim lighting, starting with RAW format is crucial. Why? Because it gives you way more leeway to make adjustments later, especially when you’re trying to highlight those little details that often get lost in the shadows.
Once you’ve taken your shots, you can pull them into software like Adobe Lightroom or Photoshop. Here’s a pro tip: try increasing the brightness of the shadows and blacks. It’s amazing how much detail starts to peek out! Also, don’t forget about noise reduction. If you cranked up the ISO to get that shot, you’ll likely see some grain, but with the right tools, you can smooth that out while keeping your image sharp. For instance, there’s often a slider in those programs that lets you adjust noise reduction without sacrificing too much detail.
And if you’ve got some areas that are too bright, you can balance things out by making some exposure adjustments. Maybe you’ve shot a cityscape at night and the streetlights are overpowering – pulling down the highlights could really help. Finally, pay attention to the white balance; tweaking it can correct any odd color tones from artificial lighting. Proper adjustments here can truly elevate your photos and make them look more natural.
Using a camera with an APS-C CMOS sensor can also improve the base image quality you start with, giving you more flexibility in post-processing.
Frequently Asked Questions
How to Get Sharp Images in Low Light?
In twilight’s embrace, we can capture brilliance! By using image stabilization techniques, adjusting lens aperture, mastering camera settings, employing low light accessories, and harnessing tripod usage tips, we’ll craft sharp images that sing even in darkness.
Does Lower ISO Make an Image Sharper?
Yes, lower ISO enhances sharpness. By utilizing noise reduction techniques, considering camera stability, and factoring in lens quality, we can achieve better dynamic range and clarity, maximizing the benefits of lower ISO settings in our photography.
Is 200 or 400 Better for Low Light?
In low light, we often find ourselves dancing with shadows; ISO 400 usually edges out ISO 200, offering better camera sensitivity. Balancing exposure triangle parameters helps us enhance ideal shutter speed and minimize noise effectively.
What Is the Best ISO Setting for Low Light?
For low light, we find ISO sensitivity around 800-1600 ideal. Balancing camera settings like noise reduction and adjusting the exposure triangle with image stabilization and lens aperture helps us capture sharp, detailed images in challenging conditions.


