As an Amazon Associate, we earn from qualifying purchases. Some links on this site are affiliate links at no extra cost to you. Our recommendations are based on thorough research and editorial judgment.

Product Photography at Home: Simple Setups With Minimal Gear
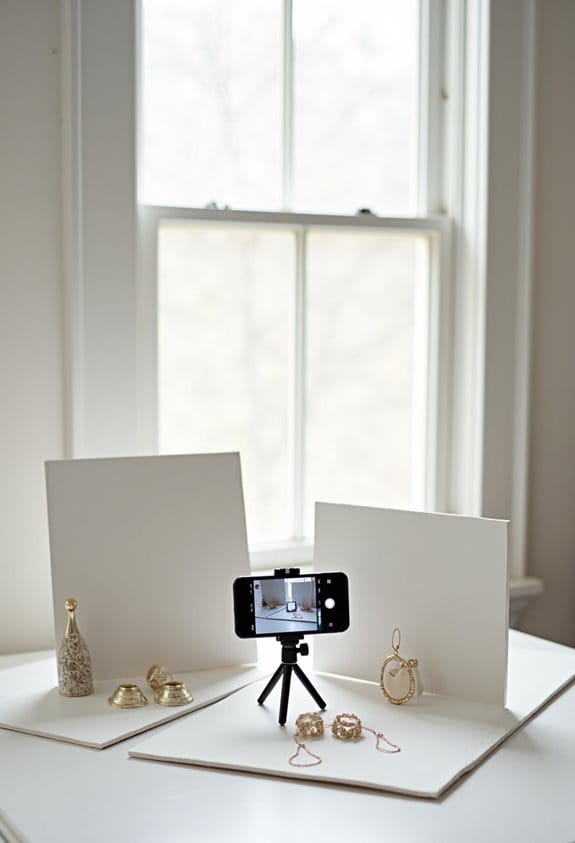
For effective product photography at home, we should keep our setup simple and use minimal gear. A clean background is essential, so a white sheet or poster board works well. Natural light is best, so let’s position our products near a window for even illumination. A tripod can help reduce blur. By experimenting with different angles and close-ups, we can showcase product details. There’s more we can learn about enhancing our images and sharing them effectively.
Key Takeaways
- Use a clean, seamless background, like white paper or vinyl, to keep focus on your products and minimize distractions.
- Position your setup near a window to leverage natural light, ensuring even illumination and reducing harsh shadows.
- Utilize a smartphone with at least a 12 MP camera, ensuring the lens is clean for crisp, clear images.
- Incorporate a tripod to minimize camera shake, enhancing image clarity, especially for close-up shots.
- Experiment with various angles and compositions, capturing multiple shots to provide options and engage viewers effectively.
Planning Your Product Photography Shoot

When planning your product photography shoot, it’s really important to keep a few key steps in mind to make sure everything runs smoothly. First, let’s start by jotting down a detailed product list along with the types of shots we want, like Product Photos, Lifestyle Photos, and Flat Lay Photos. Think of it like creating a mini shot list to stay organized!
Next, we should keep our setup nice and simple. A seamless background, like some white paper or vinyl, can really help in keeping the focus on your products without any distractions. For the best lighting, try positioning your setup near a window. Natural light can work wonders, giving your products that appealing look without needing fancy lighting gear. If you’re shooting something shiny, like a glass bottle, placing it in the right light can create beautiful reflections.
Don’t forget about stability when snapping those photos! Using a tripod can make a huge difference in keeping your shots crisp and clear. As you go through the shoot, try to be flexible. Sometimes, the best shots come from spontaneous moments that aren’t on your list. So if you suddenly feel inspired to change things up, don’t hesitate—it could lead to some amazing images!
Also, having your gear organized in a DSLR sling bag can make your shoot more efficient by providing quick access and protecting your equipment.
Now that we’ve covered the basics, let’s talk about how to make those shots pop with props and styling.
Essential Equipment for Product Photography

When it comes to product photography, having the right essential equipment is key to capturing those stunning images that really showcase your products. For starters, a smartphone with at least a 12 MP camera can do wonders! Just remember to keep that lens clean and try getting close to your subject for sharp shots.
And speaking of stability, let’s talk about tripods. Using something like the Amazon Basics 60-Inch Lightweight Tripod can really help reduce camera shake, so your images come out nice and crisp. It’s remarkable how something so simple can make such a big difference!
Don’t forget about lighting either. Controlled lighting from kits, like the Neewer 2-Pack Dimmable LED Light Kit, can brighten up your setup and let you adjust the atmosphere of your shots easily. Plus, reflectors, such as the Neewer 5-in-1 multi-disc reflector, are fantastic for bouncing light onto your products and minimizing those pesky shadows.
Lastly, a simple yet effective background—whether it’s dark or wrinkle-free—creates a clean visual space that keeps the focus on your product. Think about what you want to convey in your images! With these essentials, you’ll be on your way to capturing amazing product photos that truly stand out. What do you think will be your next step in elevating your photography? For even better lighting control, consider adding a DSLR flash with a high guide number (GN) for powerful and adjustable brightness.
Techniques for Taking Engaging Product Photos
Hey there! If you’re looking to create engaging product photos, let me share some handy techniques that really make your shots pop. First off, natural light is your best friend. Try positioning your products near a window to get that soft, even glow—this helps eliminate those pesky harsh shadows that can distract from your item.
Now, if you want to keep your images clear and sharp, grab a tripod. This is especially useful for close-ups where details matter. Have you ever tried taking photos from different angles? An overhead shot can be a great way to showcase the unique features of your product. And don’t forget about reflectors! They bounce light back onto your subject and can brighten up your photos significantly.
It’s a good idea to capture several versions of each product photo too. That way, you have different options to choose from later and can highlight various details or angles. These straightforward techniques can really boost the quality of your images without needing fancy equipment. So, why not give them a try next time you’re photographing your products? Using a camera like the Nikon Z 30 with its flip-out touchscreen can make positioning and framing your shots much easier.
Editing Your Product Images for Maximum Impact
Hey there! So, let’s chat about editing product images—it can seriously boost their appeal when done right. By using software like Adobe Photoshop or Lightroom, you’re not just tweaking colors or brightness; you’re enhancing image quality while keeping your products front and center. For instance, a crisp, clean white background can really make your items pop, grabbing attention right away.
It’s all about those subtle edits, though. You want to maintain the integrity of your product. Overdoing it can turn potential buyers off, so keep things looking natural. And don’t forget this important step: always save your original images before diving into edits. This way, you can go back to the original if something doesn’t feel quite right and pick the best version later.
One handy tip is to use gridlines on your camera app while taking your photos—this helps with alignment and keeps everything looking neat and professional. With a bit of practice and experimentation, you’ll be able to take striking images that really showcase what you’re selling. And once you’ve got the hang of it, you might find that editing becomes part of your creative process rather than just a chore! Let’s explore more techniques to take your visuals to the next level! Proper lighting, such as using an external flash, can greatly improve the final image quality by providing consistent and well-controlled illumination.
Sharing Your Product Photos Effectively
Okay, so once we’ve polished up our product images, the next exciting step is to share them effectively. Social media platforms are a fantastic way to get those high-quality images in front of a larger audience. For instance, if you post a picture of a stylish new bag on Instagram and run a quick poll, you can easily see which image gets more likes or comments. This helps us figure out what customers are really into!
It’s super important to make sure we’re using both cameras and smartphones to capture sharp and eye-catching shots. You wouldn’t believe how much a little extra time spent on lighting can completely transform a photo! Plus, if you tweak your angles or backgrounds, you might find a combo that really pops.
Don’t forget to check out social media analytics—those little insights tell us which images resonate the most, guiding our future posts and strategies. For example, if you notice a specific style of photography gets a lot of engagement, you might want to use that style more in your upcoming posts. Sharing fresh content regularly, like the cool shots available on resources like Burst, keeps your followers interested and coming back for more. Highlighting your most successful images in marketing campaigns can also boost your brand’s visibility, which often leads to more sales.
Using cameras with advanced image stabilization can help produce clearer product photos, especially when shooting handheld.
Tips for Achieving Professional Results at Home
Hey there! You might think getting professional-quality product photography at home is a tough nut to crack, but it’s actually pretty doable if you know a few tips. Start by using a clean flat surface and a simple backdrop, like a plain white sheet or a piece of poster board. This keeps all the attention on your products, which is exactly what you want!
Next, find a spot near a window. The natural light coming in can help brighten up your photos without creating those harsh shadows that make things look unprofessional. If you have a tripod, definitely use it! It keeps your camera steady and helps produce sharp, clear images. For example, if you’re photographing a watch, a steady shot can really showcase the details in the face.
Don’t forget about angles! Experimenting with overhead shots or getting close-ups can lead to some really engaging compositions. And once you have your shots, consider using free editing apps like Snapseed to touch up colors and make sure your products look their best. It’s amazing what a little editing can do!
To efficiently carry and protect your equipment during shoots, choosing a camera bag with customizable storage can make organizing your gear a breeze.
Frequently Asked Questions
What Are Some Quick Ways to Declutter My Shooting Space?
To declutter our shooting space, we can use organization techniques like minimal props, clever storage solutions, and quick clean ups. Let’s focus on neat backgrounds for efficient workspace optimization, creating our ideal clutter-free environment!
How Can I Avoid Reflections in My Product Photos?
To avoid reflections, we’ll use a polarizing filter and select the right surface. Diffuser materials help soften light, while adjusting camera settings and positioning lights strategically, along with editing techniques, enhances our background textures.
What Colors Work Best for Backdrops?
When choosing backdrop colors, we should consider color psychology. Neutral tones create harmony, while vibrant colors energize. Seasonal themes add personality, and textured materials enhance contrast, making our product photos more visually appealing and engaging.
Can I Use Natural Light Instead of Artificial Lighting?
They say, “The early bird catches the worm.” We can definitely use natural light! It enhances products beautifully, especially outdoors. With smart window placements and diffuser techniques, we’ll achieve great consistency during ideal times of day.
How Do I Choose the Right Angles for Different Products?
To choose the right angles, we’ll explore different perspectives, considering product dimensions and context shots. Let’s highlight features through creative compositions and perspective shifts, ensuring our visual storytelling captivates the audience’s attention effectively.


