As an Amazon Associate, we earn from qualifying purchases. Some links on this site are affiliate links at no extra cost to you. Our recommendations are based on thorough research and editorial judgment.

How to Shoot in Harsh Midday Sun Without Ugly Shadows
To shoot in harsh midday sun without ugly shadows, we should consider several techniques. First, using natural shade or diffusion materials can help soften the light. Adjusting our camera settings, like using a higher f-stop and exposure compensation, will improve our images. Positioning reflectors can balance shadows, while backlighting creates a soft effect. We might also explore creative angles to reduce harsh contrasts. With practice, mastering these techniques can elevate our photography skills under bright conditions.
Key Takeaways
- Utilize natural shade or diffusion materials to soften harsh sunlight and minimize strong shadows on subjects.
- Backlighting creates a halo effect, reducing the impact of harsh light while enhancing skin tones.
- Use exposure compensation to underexpose slightly, protecting highlights and maintaining subject clarity.
- Experiment with different camera angles and perspectives to minimize harsh shadows in your composition.
- Post-process your images with software like Lightroom to adjust exposure and color balance affected by strong sunlight.
Understanding Harsh Light Conditions

Have you ever found yourself struggling with photography during those bright midday hours? From around 11 AM to 2 PM, the sun can create really harsh light, making it tough to get that perfect shot. When the sun is at its peak, it casts strong shadows that can make your subjects squint or appear uncomfortable. It’s like trying to take a picture of someone while they’re facing a flashlight—definitely not the look we want!
These intense contrasts can exaggerate features in unflattering ways, which is particularly tricky for portrait photography. For example, if you’re taking a picture of a friend under the blazing sun, their nose might cast a shadow on their face, and that detail can easily get lost in the bright spots. One way to soften that harsh light is by finding natural shade, like under a tree, or using a simple diffuser to soften the sunlight. Reflectors can also help bounce light in a more flattering way.
Using these techniques can really enhance the quality of your images and make your subjects feel more comfortable. So next time you’re out shooting during those bright hours, remember these tips to transform the light into something beautiful for your photos! Additionally, selecting a lens with an appropriate aperture range can help control exposure and depth of field in strong light conditions.
The Importance of Exposure Management

When you’re out shooting photos in bright midday sunlight, managing exposure is super important to capture those stunning images. The harsh light can create some tricky shadows, especially on your subject’s face. A simple trick is to use exposure compensation—just underexpose a little, somewhere between 0.3 to 0.7 stops. This minor adjustment helps protect those bright highlights while keeping your subject’s features sharp and clear.
If you’re shooting in RAW format, it’s a game-changer for your editing later on. Why? Because RAW files let you recover detail in both the highlights and shadows during post-processing, which expands your dynamic range significantly. For instance, if the afternoon sun is glaring, and you notice highlights getting blown out, underexposing slightly and shooting in RAW can help you pull that detail back when you edit.
Understanding how midday light interacts with your camera settings will give you more control over your images. With these tips in your pocket, you’ll be making smarter choices for well-balanced portraits in no time. And once you’ve got your exposure dialed in, we can explore fun ways to compose your shots!
Choosing a camera with user-friendly interface can make managing these settings much easier, especially if you are new to photography.
Utilizing Shade and Diffusion Techniques
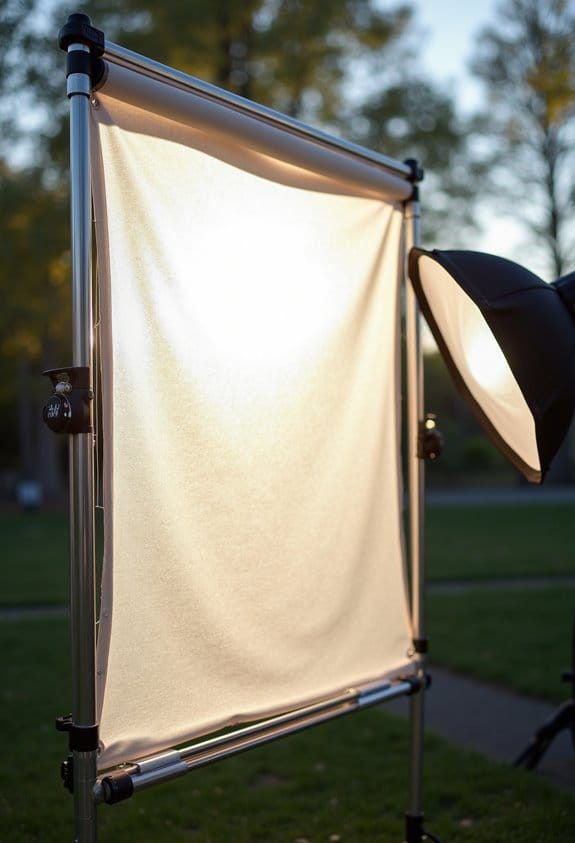
Shade and diffusion techniques are super handy when taking photos in bright sunlight! Instead of dealing with those harsh shadows that can pop up on your subject’s face, try placing them in natural shade—think under a tree or an awning. This way, you’ll get more even lighting, which is way more flattering.
Using diffusion materials, like a piece of translucent fabric, is another great trick. It gently softens the strong sunlight and creates a warm glow on skin tones. Picture this: you’re at the park, and there’s a lovely dappled light coming through the leaves. Not only does it look beautiful, but it also protects your subjects from getting sunburned!
If you’re finding that even after using shade, there are still some shadows, try using an off-camera flash. It can help fill those in for a more balanced look. You might want to test different angles while you’re in those shady spots to really make your subjects stand out. It turns the whole scene into a beautiful setting! Now that you’re equipped with some shade and diffusion tips, let’s talk about how to compose your shots for maximum impact.
In addition, adjusting the brightness using dimmable lights can fine-tune the softness and balance of your lighting for better results.
Incorporating Reflectors for Balanced Lighting
You know how tricky outdoor photography can be, especially with that harsh sunlight? Well, that’s where reflectors come in handy! These nifty tools bounce sunlight back onto your subject, helping to fill in those pesky shadows for a more balanced exposure.
When you’re picking a reflector, think about the color. Silver reflectors give off a cool tone, while gold ones add a lovely warmth that can really enhance your subject’s skin tones. For example, if you’re shooting a portrait in bright sunlight, a gold reflector can make the subject’s face glow beautifully, while a silver one might lend a more dramatic look.
Getting the angle right is also super important. Hold the reflector so it directs light onto your subject’s face, but be cautious of glare that can ruin a shot. Portable reflectors are perfect because they’re easy to move around. If you experiment with sizes, you’ll notice that larger reflectors provide a soft, diffused light, while smaller ones can create striking highlights, which is ideal for portrait work. Choosing a reflector with the right light diffusion effects can significantly improve the quality of your images by controlling shadows and highlights effectively.
Embracing Strong Sunlight for Creative Opportunities
You know, when we’re out taking photos, strong sunlight can actually be our best friend if we learn how to work with it. Instead of running from that intense sun, why not embrace it? When done right, strong sunlight can help you create some really dramatic images filled with striking shadows and bold contrasts. For instance, try positioning your subject at an angle where their shadow falls beautifully across the frame. It adds a whole new layer of depth to your shot!
Another fun idea is to play with backlighting. When you place your subject between the light source and your camera, it creates this stunning halo effect. This can soften the harshness of the light and give your portraits a dreamy vibe. Think about shooting someone with the sun behind them during golden hour; the results can be magical!
Don’t forget about using reflective surfaces, too. If you’re near water or glass, take a moment to notice how the colors pop and the exposure balances out. And remember, experimenting with different angles can turn those harsh sunlight rays into really interesting patterns and shapes. It’s all about seeing the light differently and making it work for you. Ready to give it a shot?
Using a camera with advanced image stabilization can help you capture sharp and clear photos even under the challenging conditions of midday sun.
Adjusting Camera Settings for Harsh Light
Hey there! When we’re out shooting in bright sunlight, tweaking our camera settings is super important for getting those stunning shots. One of the best tricks is to switch to spot metering mode. This helps us lock in on our subject’s face and keeps the bright background from stealing the show.
Now, to avoid those pesky blown-out highlights when the light is really harsh, try underexposing your shots a bit. A good rule of thumb is to adjust the exposure compensation to somewhere between -0.3 and -1. And remember to keep an eye on your shutter speed; shooting at 1/250th of a second or faster will help you handle the brightness more effectively. For instance, if you’re photographing a portrait outside, a higher f-stop like f/11 gives you a lovely depth of field while keeping your subject nice and sharp.
Lastly, consider using a neutral density filter. It’s like putting sunglasses on your lens, which helps reduce the amount of light entering, giving you even better control over your exposure settings. This way, you can concentrate on getting that perfect shot without being overwhelmed by bright light.
Also, having your gear organized and protected in a DSLR sling bag can make quick adjustments easier and keep your equipment safe during such challenging shooting conditions. Moving on from camera settings, let’s talk about composition techniques that can really enhance your photos!
Strategies for Shooting With Backlighting
Hey there! If you’re wondering how to make the most of backlighting in your photos, let me share some tips that’ll really help you capture stunning images. First off, try positioning your subjects so that the sun is right behind them. This setup creates a beautiful halo effect around their silhouette, which helps to soften the intense light hitting their faces.
Next, guide your subjects to look toward their shadows. This not only helps them avoid squinting but also gently illuminates their features, giving a warm glow that makes a big difference in the shot. For example, if you’re photographing someone outdoors at sunrise, have them face a little away from the light while still capturing that gorgeous backlit effect.
Don’t forget to use spot metering mode on your camera. This will prioritize the exposure on your subjects’ faces, ensuring they come out bright without making the background too washed out. Remember to make small adjustments to the angle or position of your subjects until you see that lovely soft glow outlining them. Lastly, consider using reflective surfaces or a diffuser to bounce some light onto their faces. This simple addition can help reduce those harsh shadows while still keeping that dreamy backlighting intact.
Using a camera with fast Dual Pixel CMOS AF will further help you keep your subjects in sharp focus even under challenging lighting conditions.
Once you’ve gotten these techniques down, the way light interacts with your subjects will open up a whole new level of creativity in your photography!
Exploring Creative Angles in Harsh Conditions
Shooting in harsh sunlight can be a real challenge, but one fun way to tackle it is by playing with creative angles. Instead of just shooting straight on, how about you experiment with low or high perspectives? For example, crouching down to shoot at ground level can actually help minimize those harsh shadows on your subjects.
Another tip is to think about incorporating foreground elements into your frames. This might mean including some flowers or rocks in the shot, which not only adds depth but also draws attention away from any unflattering shadows on your subject. And don’t forget about nature’s little helpers—like tree branches—that can provide a bit of shade and frame your subject beautifully. If you’ve got a wide-angle lens handy, use it! It can really pull in those expansive backgrounds while keeping your subject sharp, which helps distract from any problematic shadows.
Using a camera with a high-resolution APS-C sensor can further improve image detail and quality in these challenging lighting conditions.
Post-Processing Techniques for Enhancing Images
Hey! You know how taking photos in harsh sunlight can be a bit of a nightmare sometimes? Well, here’s the good news: post-processing techniques can really help us out. With tools like Adobe Lightroom or Photoshop, you can tweak things like exposure to keep those bright highlights just right while making the shadows look deeper and more interesting.
For instance, you can use gradient filters or brush tools to evenly distribute the light in your photo. If a part of your image is too bright, you can tone it down while boosting the areas that need a little more love. And don’t forget about color grading! It helps fix any weird colors caused by that harsh sun, so your image looks more natural and cohesive.
Another cool tip is to play around with sharpness settings. Sometimes the bright light can make your photos a tad soft, and adjusting the sharpness can really bring out those fine details. Oh, and adding a little vignette can draw the viewer’s eyes right to your main subject, minimizing any distractions. All these techniques can drastically improve your images, making them pop! Additionally, using cameras with image stabilization features can help reduce blur caused by hand movement, enhancing the clarity of your shots even in challenging light conditions.
Additional Resources for Mastering Harsh Light Photography
When it comes to capturing stunning images in harsh light, mastering your post-processing techniques is key. But there’s more to it than just editing—seeking out additional resources can really take your photography to the next level. For instance, have you ever thought about finding a mentor? An experienced photographer who’s dealt with tough lighting can provide personalized tips that can really help you improve.
Online tutorials can also be a great resource. They offer practical tips and visual examples that make it easier to understand how to handle those bumpy exposure challenges. Plus, joining photography forums is another way to get involved; you can swap stories with fellow photographers and get constructive feedback on your work.
Don’t overlook the power of post-processing software, either! There are tons of tutorials out there that specifically teach you how to tweak exposure and contrast to get just the right look. And, if you check out free educational materials from well-known photographers, you’ll gain insights into managing those pesky shadows and highlights. So, just like anything else, practice and continuous learning are your best friends in mastering harsh light photography. It’s all about putting in the effort, and soon you’ll be seeing major improvements in your shots! Regular maintenance of your gear using a camera cleaning kit ensures your lenses stay clear, helping you capture the best image quality possible even in challenging lighting conditions.
Frequently Asked Questions
How to Shoot in Harsh Sunlight?
When it comes to shooting in harsh sunlight, we should remember, “Don’t throw in the towel.” Use golden hour lighting, apply exposure compensation, and consider diffusion material, reflective surfaces, or a lens hood for better results.
How to Shoot in Midday Sun?
When shooting in midday sun, we use midday lighting techniques like shaded areas for portraits. Adjusting sunlight exposure settings and employing creative shadow usage helps, while exploring golden hour alternatives can enhance our outdoor photography results.
How to Avoid Harsh Shadows in Photography?
To avoid harsh shadows in photography, we can embrace soft diffuse lighting, use reflective surfaces, and master shadow manipulation tips. By sourcing natural shade and employing fill flash techniques, our subjects shine beautifully, free from distractions.
What Is the 20 60 20 Rule in Photography?
The 20 60 20 rule is a composition technique guiding us in a 20 60 20 breakdown of foreground, subject, and background. We can apply exposure adjustments and light manipulation to enhance subject placement effectively.


